
You can purchase these cases on my online store.
No matter how simple and straightforward the design, the process and attention to detail are integral to a high quality finished product.
I designed this tool case to fit the thin picks and tension wrenches in a locksmith or locksport enthusiast's arsenal. I wanted the case to be slim and functional, yet elegant and easy to organize. It should be reasonably quiet to open (who enjoys the sound of ripping velcro!?), so I used a solid brass snap rather than the more popular hook and loop closure.
I've included photos from both the black and brown versions.
Here's what goes into making each of these cases by hand
Initial cuts are made from a side of premium leather.
Each pocket is subtly chamfered on the inside edge to ease tool insertion and reduce mushrooming when the edge is finished.

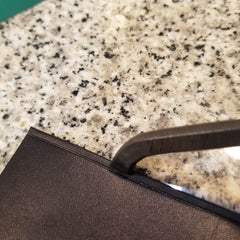
I heat an edge creasing tool using a torch, and bead the top edges of each pocket. The exposed fibres are compressed and sealed.

The front pocket is glued to the middle pocket.
The contact adhesive I use is water based, yet is fully waterproof when it dries. To ensure maximum adhesion, I rough the smooth surfaces of the leather before applying the glue.

I measure places for the snap and stitching, and scribe the marks into place. The holes are punched, and the initial pocket divider is stitched into place. The completed stitches are hammered to set them tightly.


The rest of the pockets are carefully aligned and measured, and glued into place.
Here you can see the rustic brown with its corners rounded after glueing and trimming, but before the edges are cleaned up:

I mark a seam allowance, and punch every hole with angled, diamond-shaped holes.


The main seam is stitched by hand, using waxed, braided thread. A two-needle, traditional saddle stitch is used that results in an extremely resilient assembly that is unmatched by machine stitching.


The flap edges are trimmed, tapered, and rounded, and the outer snap is set.

Finally, the edges are rounded, sealed, and polished using local beeswax and a traditional edge treatment process.
If you have any questions, please feel free to contact me
Leave a comment